How to Install a Long Range WiFi Antenna on Your Boat
The world is becoming a smaller place. With the immediate availability of the internet, everyone is a step closer together. Websites like Facebook, Pinterest, Twitter, Instagram, etc. link us all in a way that wasn’t possible a few years ago. In what some call “six degrees of separation”, it has been discovered that every person is only 6 friends away from any given person (or Kevin Bacon as the saying goes). The internet has become an integral part of how we shop, communicate, work, and play. It’s become an essential part of daily life for many people, and cruisers are no exception.
Just because we’ve left the big city behind doesn’t mean we have to be disconnected (at least not unless we want to be). The virtual office is the new office of the future, and that office can be anywhere. The point in case, I’m writing this from my sailboat on the hook. Tomorrow will be another island off in the distance. Who needs a cubical? As long as we can connect to the world via technology, we can work from anywhere (whether you’re a day trader, a programmer, or a blogger).

The parts list you will need for this project:
- 12db Omni directional antenna (This is a good all-around mid-range antenna and works well on a rocking boat.)
- The Ubiquiti Bullet 2HP
- Power over Ethernet adapter
- Cat 5 cable
- Wifi router
- 12v to 5v regulator (optional)
- RJ45 crimp ends and
- Crimp tool(optional)
- Through hull grommet for cable (optional)
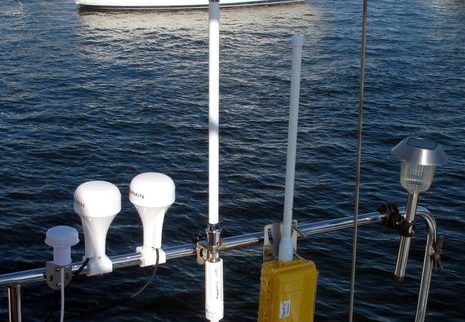
To start, install the antenna in a location that is clear of other metal and obstructions on your boat. We chose to install ours on the aft, on the bimini top. There’s a trade-off to consider with mounting higher on the boat. The mast, perhaps, would give the best line of sight to land for your antenna – thus the best reception. The trade-off here is that the mast covers more area during the rocking of the boat ( Think of an inverted pendulum with the top of the mast being the bottom of the pendulum – it covers more distance).
If you mount your antenna higher, you may want to consider going down in decibels; this will give a wider beam for the reception, though, a shorter distance. The antenna comes with u-bolts that work well for mounting around a 1″ stainless rail. You’ll need to provide self-tapping screws if you decide to mount to the mast.
Once the antenna has been mounted, the Bullet will screw into the base of the antenna’s N-type female connector. Unlike other systems that have long runs between the antenna and repeater, the short distance between the antennae and the Bullet will minimize single loss.
The Cat 5 cable plugs into the base of the Bullet and the Bullet’s protective cover screws onto the base to protect the Cat 5 connection. It may be necessary to cut the Cat 5 cable to get the protective cover over the end. Having one end cut also makes it easier to run the cable through the hull of the boat. Once inside the hull of the boat, a new RJ45 end can be crimped on to the cable using the crimp ends and crimp tool.
Next, determine where your wifi router will be mounted inside the cabin. We’re using a house-hold router. Thus it must stay dry. You’ll need access to your fuse panel and a fused 12v source. Our wifi router works off of a 5v ac adapter. Instead of using the ac adapter with an inverter, we decided to wire both the Power over Ethernet (PEO) and the router into the same breaker for convince. Using this method, we can just flip one switch and both the Bullet and the router power on. You’ll use the 5v regulator to wire the wifi router directly to the 12v system. Make sure the router that you’re using requires a 5v input before purchasing the 5v regulator.

Before we can wire everything up for use, we must perform two setup steps:
- The wifi router needs to be configured
- The Bullet needs to be configured
To configure your router, follow the manufacture instructions. Most likely this will involve hooking the router directly up to a laptop and running through their configuration CD. When you are done with this step, you should have:
- Named your router by giving it a unique SSID
- Secured your router using one of the forms of security built-in (WEP, WPA, etc).
- Created a login account for your router with a password (that you have written down safely for future reference).
Most router manufacturers provide complete instructions for these steps, and some offer a CD that will help configure the router. Once the wifi router is configured, you should plug it into the PEO port marked “network”.
The rest of this article will deal with configuring the Bullet. To start the Bullet configuration, you will need to plug it directly into a laptop. The instructions provided here are for Windows 7. If you are running a different operating system, you may need to modify some of the steps listed below.
Configuring the Bullet
After connecting the Bullet directly to your computer’s Ethernet port, follow these steps:
1.Under the control panel select Networking and sharing center and then select change adapter settings (on the left)
2. If your local area network is not on, then right-click over the icon and select Enable.

3. While configuring the network, we’ll need to temporarily turn off your wifi by righting clicking on “Wireless network” and selecting “Disable.”
4. To configure your network settings, double on “local area connection.”
5. Double click on “Internet Protocol Version 4″ and configure your panel as shown below (using 192.168.1.21 for your IP address and 192.168.1.20 for the default gateway). Select ok twice when finished.

6. You should now be able to access the Bullet from your computer. Two LEDs should be lit on the Bullet indicating that it has power and a network connection. To talk to the Bullet, open an internet browser and enter in the IP address of the Bullet into the address bar of the browser: 192.168.1.20
7. If all went well, you should now see the gray airOS page with a login dialog. Enter the default user name and password for the Bullet: ubnt (used for both username and password), and then log in
8. Once logged in, select the System Tab and create a new user name and password for your Bullet. This will be how you log into the Bullet from this point on.
9. Next, select the Network tab and change the following settings:
- Network mode: Router
- DHCP should be selected
- Under LAN network settings the IP address should be changed to: 192.168.100.20 and Netmask should be: 255.255.255.0
- Enable NAT and make the start to end range: 192.168.100.100 to 192.168.100.200 with a Netmask of 255.255.255.0
- Click change at the bottom but do not click the “apply” when the message pops up at the top. We have more changes to make first.
(Note – if you got a little click-happy in the step above and have already clicked apply, you’d need to go back to step 5 and change the IP address to 192.168.100.21 and 192.168.100.20 respectively before you will be able to access the Bullet again. Remember to login back in using your new username and password)
10. Click on the Advanced tab and configure these settings:
- Enable Noise immunity
- Set the distance to 0 miles
- Turn on Auto adjust for the ACK time outs
- Click change at the bottom but don’t click apply yet.
11. Click on the wireless tab and make the following changes
- The wireless mode should be: Station
- Set output power to the max
- Click change and then click the apply button at the top.
12. The Bullet has now been configured and lives on a new IP address: 192.168.100.20. At this point, we’ve temporarily lost connection to the Bullet. Following the instructions in step 5, go back into the TCP/IP v4 settings and change select Obtain an IP address automatically and Obtain DNS server address automatically. Select ok twice and close out the networking windows.

13. We’re now ready to hook everything up and scan for available networks. Unhook your computer from the Bullet and plug the Bullet directly into the PEO adapter. The other end of the adapter should be plugged into your wireless router.
14. With everything connected and powered on, use your computer or tablet (or phone), to connect to your home network. You should be able to connect any wireless device to your router via wifi using the security settings you configure during the router setup. Once your device is connected to the router, we will be able to access the Bullet and scan for wifi signals to connect to. At this step, you will not have internet, just a connection to your router.
15. Access your Bullet using the new IP address: 192.168.100.20. Type this address into your web browser. Login in using the username and password you set up in step #7
16. Click on the wireless tab and click on the “select” button. A new window with a site survey will popup. You can sort by signal strength or by encryption type. The closer the signal strength is to 0, the stronger the signal. i.e., -40 dBm will be a better signal then a -90dBm. Select any network in the list and then click select. Keep in mind, if the network you select has Encryption, then you will need a password or credentials to connect to this network. Once back on the previous screen, you will be able to see the network you selected in the ESSID box. Now click “change” at the bottom, then “Apply” at the top. If you’ve selected a good network, you should now have internet.
Finally
From this point on, you will be able to use steps 15 and 16 to select a network during your travels. Just log into the Bullet, scan for available networks, and pick the best signal network that you can find for that area. If there are no unencrypted networks available, you may need to make a stop at the local water hole for a beer and to obtain their password.