How to Winterize Your Sailboat
Winter maintenance of our sailboat is one of the most important things that we must do every year with great care and planning so that our boat is ready to travel the coming season without problems and unpleasant consequences.
Proper maintenance during the extended winter immobility will save you a great deal of wear and tear, and expenses while minimizing the chances of missing out on a valuable sailing trip in the coming season.
Since we always want to be prepared, we present you with a brief guide on what our winter maintenance service should include.
Exterior Maintenance
First of all, we perform an extensive check. Then, we remove all the ropes, wash them with soap, dry them in a shady place, and store them in a dry place. Worn or rotten ropes are replaced with new ones immediately. I repetitive soak the ropes in freshwater, followed by a soak in fabric softener.
We collect the sails, wash them, repair small tears, and check them carefully for damage. Now we store them in a dry place until we need them again.
Open the winches and clean and lubricate them. Immediately after maintenance, cover them with plastic bags and tape for extra protection.
We cover all instruments with plastic bags and tape to protect them from moisture and weather.
We inspect the steering parts internally if we have a tiller and the wire ropes if we have a steering wheel.
If necessary, we send the anchor for galvanizing.
The anchor chain should be clean and not rusty. A rusty chain, apart from being ugly, can be cut, and that has terrible consequences. We send the rusty chain immediately for galvanizing.
It is a good idea to take the chain out and put it upside down so that it does not get worn at the same spots every year.
We check the rollers we use for the anchor and replace any broken, twisted, or worn ones.
In the anchor windlass, we check the following:
- The Oil
- The screws and the gypsy wheel for wear or damage
- The base and its screws
- The sealing of the motor and the electrical parts
- The motor.
The rails and the stanchions and repair any damage
We check the mast and the boom. We check everything from the backstay, the forestay, the spreader, the chainplates to the joints, etc.
After checking, we should call an expert to tune the mast and perform the final check.
We check the toe rail for any impacts. The toe rail is usually made from aluminum and ties the hull and deck around the boat.
Check the lifejackets, replace the lantern batteries with fresh ones, and check that the lamp on the lens is working when it is in the correct position.
Haul Maintenance
Immediately after lifting and placing the boat on the stands, we scrape the algae (the green substance is on boat’s hull) and the barnacles (tiny shellfish) that has set on the hull, shaft, and propeller. These organisms, apart from being bad for the boats’ hull, can slow the speed of a sailboat up to 50% in extreme cases because it increases the “friction” between the hull and the water.
The best thing is for the boat to come out with some light algae on the hull and not with barnacles. A lot of algae with barnacles means a sub-par job at the previous maintenance.
Barnacles, especially where there are water inlet and outlet holes, reduce its flow and can block them altogether. Imagine blocking the inlet that delivers seawater to cool the engine!
- After scraping the hull, we wash it with a waterjet (high-pressure water), and any items stuck on the antifouling paint are removed.
- Scrub the old antifouling paint and let the boat dry.
- At this point, we have the ability to check the boat for any cracks or abrasions on the kneel, rudder (steering fin), and hull of the boat. If we notice any, we need to repair them.
- If we notice bubbles, we must consult with an expert to rule out the possibility of osmosis.
- We change the anodes on the engine’s shaft and steering wheel.
Finally, before we put the boat back into the water, we must pass the hull with antifouling paint. It is advisable to cross the hull with two-three hands and the rudder with three-four hands and an imaginary line 15cm (6in) below the waterline. In any case, follow the antifouling paint manufacturer’s instructions.
Interior Maintenance
It’s time for large-scale cleaning. Our first job is to list the tasks that need to be done, prioritize them, and set a timetable for their completion.
- We sweep, mop, wash the covers, the fabrics, and generally anything that can be removed and washed. After washing, store them in a dry place until reused. At the same time, we check for any damage. Pay special attention to the lifejackets and safety equipment.
- Send lifejackets and other safety equipment for washing, checking, and any repairs like sewing.
- Also, remove all the expensive and sensitive instruments inside the boat and store them in a safe and dry place.
- Clean and paint the bilge if necessary and inspect the pipes and valves.
- Inspect the wooden components and repair any damage.
- We could varnish the wooden parts, but it’s better to do it in the spring because there is humidity than in the winter.
- Check all hatches for any leaks and, if necessary, replace the gaskets. You could apply some petroleum jelly to the gaskets to improve water resistance and to promote its life lifecycle.
- Check all pumps and filters for the bilge, freshwater, sewage tank, etc.
- Check if the boats’ valves are working and whether they are leaking.
- We take the toilet apart and check the sewage pump with great care. Make sure to close the water inlet and outlet valves first.
- We are cleaning the kitchen thoroughly from the dirt it has been collecting all summer. We also check the gas’ hose for damage and the safety valves.
- In the boats’ chart table we check and replace what has been damaged or lost (Nautical charts, Calipers, Pencils, etc.)
- Check essentials like a flashlight, batteries, toolbox, and first aid kit, flares, etc.
Marine Engine Maintenance
- Check the engine cooling seawater inlet for any blockage.
- Check, clean, and change the fuel/water separator.
- Change engine fuel filters
- Change engine oil (every 100 hours)
- Check for oil leaks. Tighten any screws in case of leakage or change the flange or seal.
- Change gear oil (every 1,000 hours or once per year).
- Change oil filters
- Check alternator and ignition
- Change the seawater pump impeller
- Check the timing belt
- Check the fuel supply pipe
- Replace engine radiators’ anode
- Check fuel tank
- Check engine mount
- Clean engine radiator
Tighten or replace the shafts’ packing braid/seal. A properly fitting packing braid must drip one drop every 10 or 15 turns of the shaft to cool the funnel. It is not good not to drip, because it will get hot, and that will cause damage.
With some experience, we can do all of these ourselves. In the end, it is a good idea to call a qualified marine engineer for a final check.
General
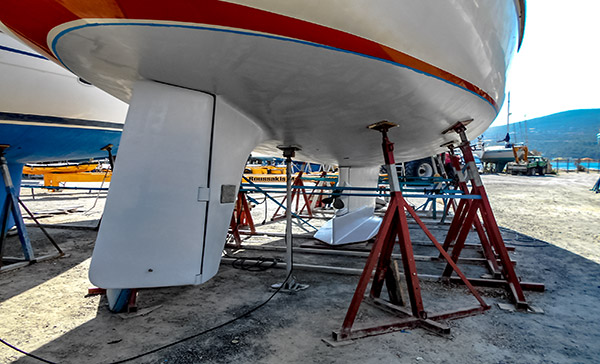
An important rule of every boat is that it has to come out of the water every year optionally or every two years mandatory.
When out of the water, it must be mounted on sailboat jack stands, or some special racks, usually near the marina that our boat was hauled out from. The boat should remain in this position for at least two months, and it needs thoroughly dry, then we should do the necessary hull repairs and then put back in the water.
Generally, we must be very careful with the choice of winter storage space for the boat while it is on land. It must be protected from various weather conditions (rain, strong winds, etc.) and generally anything that can damage our sailboat.
Then, we should do the following:
Check the boats’ papers (renew expired and replace worn out documents)
Send the life raft for its annual inspection
Check safety equipment (flares, smoke signals, etc.) expiration dates and their condition.
At least once a week, we need to put a fan heater in the boat for the humidity and leave the hatches open as long as we have it on. You can also put a dehumidifier in the boat or hang a couple of moisture-absorbing bags.
We call on an electrician to check the boats’ electronics and electrical equipment, batteries, headlights (also check the sealing), and engine electronics
We clean and polish the stainless steel and bronze parts.
General cleaning and polishing complete the winter maintenance of the boat, which is now ready to sail back into the sea safely.
Drain the water from the freshwater system. Drain the hoses and the tank and then clean the tank. Leave it empty until next season. If you have a heater tank, empty and clean it after you disconnect the electrical supply.
Pump out the waste holding tank. Run fresh water through the head several times while emptying the tank.
Remove the batteries and store them in a warm, dry place. They should be stored fully charged and never store them connected to the charger.
How to Winterize Your Sailboat – Conclusion
This is a great guide of what is the optimal way to winterize your boat properly. Although most people opt for the basics, running a complete winterization will keep the longevity of our beloved sailboat and prevent any issues next year. Also, remember that it is cheaper to maintain something than fix it all together when the time comes.
It is true that many sailors literally dump their boats in a corner and are reminded of them when the days begin to rise again and the temperature rises. But surely this is a bad mentality that leads to a “slow death” of our beloved boats. Please, after reading this sailboat winterization guide, don’t let that be you.